How To Solve The Rubik's Cube
How To Solve The White Face Of The Rubik's Cube
Solving the first face of the Rubik's Cube is
relatively easy because there are not too many solved pieces that you
can mess up.
Spend some time playing with the puzzle and try to do this without reading further this page.

- ✔Start with the white edges, then do the corners.
- ✔Make sure the side colors are matching the side center colors (image below).
- ✔Can you do this step by yourself without reading this help?
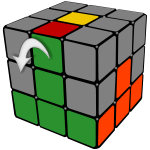
1. Solve the white edges
We start by solving the white edge pieces. Of course you can start with any other color but in this solution guide we're going to use the white so I would advidse you to use the same.


We already know that the center pieces are fixed and they define the color of each face. This is why we have to solve the white edges according to the color of the center piecess as illustrated above.
Solving the white edges is intuitive and quite easy because at this stage there are no solved pieces that we can break. In most cases you can just simply rotate each piece where they are supposed to be.
Here are a few examples that require a few extra moves.
Press the Play button to animate the rotations.
Apply this short algorithm when the piece is in the right spot (FU edge), but it's oriented wrong.
U'R'UF'
Do this when you can't simply just turn the front edge to its spot because it would be oriented wrong.
F'U'RU
The algorithm to solve the white edge when it's oriented wrong in the middle layer.
U'RU
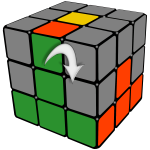
2. Solve the white corners
The white edges are solved and we have to fix the white corners to complete the first face.

This is another easy stage where you shouldn't memorize any algorithm just follow your instincts. If you have difficulties solving the white corners, here's an easy trick you can always apply, you just have to memorize a short algorithm and repeat it until the piece is solved:
R'D'RD
Bring the corner below the spot where it belongs (Front-Right-Down position highlighted with grey) and repeat the algorithm above until the white corner pops into its place oriented correctly. This algorithm sends the piece back and forth between the spots marked with dark, always changing the orientation.
Play the animation for an example where the sequence is
repeated five times. Watch the affected white corner going to the top
then back to the bottom in each step, changing its orientation.
The sixth would bring the cube back to its original position:
This trick always works but requires too many unnecessary steps. Here are the shortcuts:
FDF'
R'D2RDR'D'R

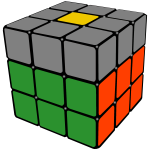
At the end of this step your cube should have a solid white face.
3. Second Layer (F2L)
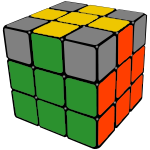
Now that we've finished the white face, let's turn the cube upside down because we don't need to see the solved side anymore.
The solution of the Rubik's Cube could be done intuitively until this point but this is where most people get stuck. The reason for that is that you would have to foresee too many steps to complete the first two layers (F2L).
We have to learn two algorithms which are symmetric to each other. We call them Left and Right algorithms.
The Left algorithm sends the edge piece from the Front-Up position to the left side while the Right algorithm sends it to the right as marked with the arrows.
Left
U'L'ULUFU'F'
Right
URU'R'U'F'UF
Wrong orientation
When there's no edge piece to insert into the middle layer you will have to execute the algorithm twice to pop the piece out in the first step.
For example, when the edge is on its place but turned incorrectly:
URU'R'U'F'UF - U2 - URU'R'U'F'UF
At the end of this step your cube should have the middle layer solved and an intact white face at the bottom.
4. The Top Cross
In the fourth step we want to form a yellow cross on the top of the cube. Don't worry if the side colors don't match the side centers because we will send the pieces to their final positions in the next step.
We solve the yellow edges on the top of the Rubik's Cube in two steps:
First we orient them to form a yellow cross on the top, then we swap the pieces to match them with the side colors.
At this point you can have one of these patterns on the top of your cube. Use the algorithm below to jump to the next state until you reach the cross.
 »
» »
» »
»
FRUR'U'F'
- Dot – we have to apply the formula three times when all top edges are oriented wrong and there are no yellow stickers around the yellow center. Make sure you reorient the cube in your hands after the first stage because the "L"-shape will be upside down.
- "L"-shape – You're two algorithms away
from the target. Make sure the yellow edges are located on the left and
back positions as illustrated.
(There's a shortcut which jumps from the "L"-shape to the cross in one step, reducing the solution time: F U R U' R' F'). - Line – Perform the algorithm once, holding the line horizontally and you're done.
- Cross – The cross is complete, you can go to the next level!
5. Swap Last Layer Edges
We have the cross on the top but the sides of the yellow edges don't match the side colors yet. We need to put them in their final destinations.
To sort this out we use an algorithm which swaps the Front-Up and the Left-Up adjacent edges marked with the arrow.
RUR'URU2R'U
In some cases two opposite pieces have to be swapped which needs to be done in two steps.
Perform the algorithm once, then rotate the cube to make sure you are changing the right pieces in the second round:
At the end of this step you should have an almost finished cube, where only the yellow corners are left to solve:
6. Position Last Layer Corners
We are very close to finish solving our Rubik's Cube.
At this point only the yellow corners remained unsolved which we are going to sort out in two steps.
First we have to relocate them and we'll orient them in the next and final step.
We use a trick to cycle the marked corners on the image, while the Front-Right-Up corner, marked with "OK" stays in place.

URU'L'UR'U'L
When you reach this point in the solution look for a corner piece which is in the right place. If you found one then reorient the cube in your hands so this specific piece is on the OK position and perform the formula. In some cases you have to execute it twice.
If there's no yellow corner on the right spot then do the algorithm to reorganize the corners and then look around again because there must be a good one this time.
An interesting fact is that in this step the number of pieces in the right spot can only be 0, 1 or 4.
7. Orient last layer corners
In the last step every piece is where it's supposed to be, but the yellow corners are oriented wrong.
To complete our cube we will use the same algorithm we used to solve the first layer corners but with a little trick:

R'D'RD
Start by holding the cube in your hand having a misaligned yellow corner in the highlighted Front-Right-Up spot (see image).
Repeat the R' D' R D algorithm until this piece comes to the correct position with the yellow sticker upwards.
Turning only the U
' D' R D algorithm until that yellow piece is oriented correctly.
Move other misaligned yellow corners to the marked spot one by one and do the formula until all corners are solved.
The puzzle might seem to be scrambled between the moves but don't worry because everything will come together when all yellow corners are oriented properly.
Watch the video or the animation below that demonstrates examples of how to use this move.


Comments
Post a Comment